3D Printer Bed Leveling: The Complete Step-by-Step Guide
Bed leveling is the single most important calibration in 3D printing. Get it right and your first layer goes down perfectly every time. Get it wrong and nothing else matters — the print will fail within the first few layers, no matter how good your settings are.
Despite the name, "bed leveling" is not about making the bed perfectly horizontal. It is about making the distance between the nozzle and the bed consistent across the entire build surface. This guide covers manual leveling, auto-bed leveling, mesh compensation, and how to verify that your first layer is actually correct.
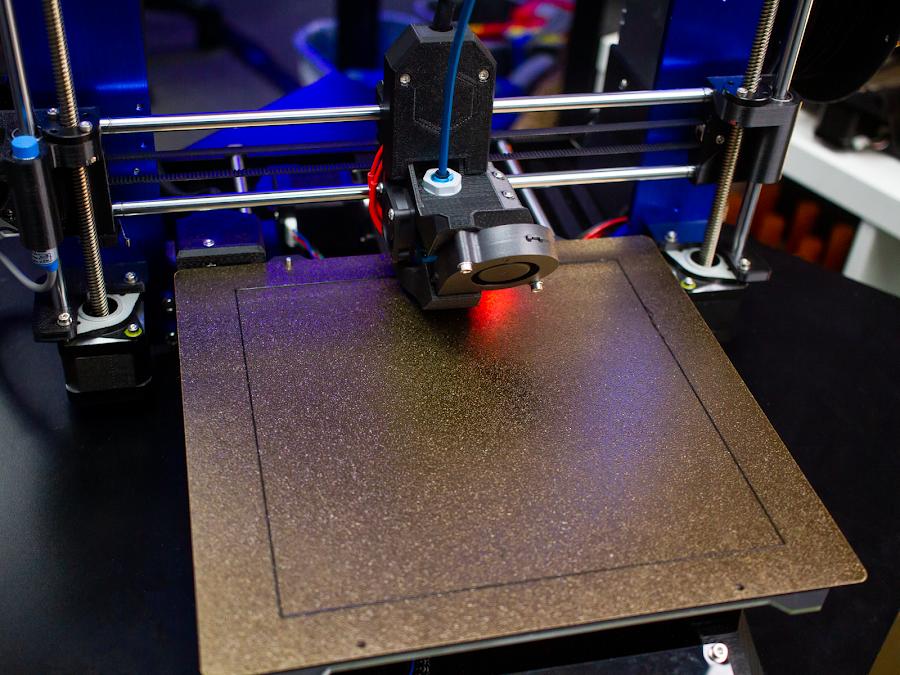
An auto-bed leveling probe (the red glowing sensor) scans the build plate to create a mesh compensation map.
Why Bed Leveling Matters
The first layer of a 3D print is the foundation. If the nozzle is too far from the bed, the filament lands in a thin, rounded line that does not stick. If the nozzle is too close, the filament gets squished too thin, causing the "elephant foot" effect or even clogging the nozzle.
The ideal first layer has the filament squished to about 70–80% of its theoretical height. That means a 0.2 mm first layer should be about 0.14–0.16 mm thick. This squish creates maximum surface contact between the filament and the bed, which is what makes it stick.
Manual Bed Leveling
Manual leveling uses adjustment screws under the bed to set the nozzle-to-bed distance at multiple points. It is slower than auto-leveling but requires no extra hardware.
The Paper Method
- Home the printer. Move the nozzle to the center of the bed.
- Heat the bed and nozzle. Heat to your printing temperatures (e.g., 60°C bed, 200°C nozzle for PLA). Metal expands when hot, so leveling cold means your bed will be off when printing.
- Lower the nozzle to Z=0. Use your printer's menu or a G-code command (G28 then G1 Z0).
- Slide a piece of paper under the nozzle. You should feel slight resistance when pulling the paper out. If it slides freely, the nozzle is too high. If you cannot pull it, the nozzle is too low.
- Adjust each corner. Move the nozzle to each corner (front-left, front-right, back-left, back-right) and repeat the paper test. Turn the adjustment screw under each corner to raise or lower that corner.
- Repeat 2–3 times. Adjusting one corner affects the others. Go around the bed 2–3 times until all four corners have the same paper resistance.
- Check the center. After the corners are set, check the center. Many beds have a slight dip or bow in the middle.
The Diagonal Method
Instead of going corner-to-corner in order, adjust diagonal corners first (front-left then back-right, then front-right then back-left). This compensates for the other diagonal while adjusting, resulting in a more accurate level. Repeat twice for best results.
Auto-Bed Leveling (ABL)
Auto-bed leveling uses a probe (BLTouch, inductive sensor, or capacitive sensor) to measure the bed height at multiple points. The printer then creates a mesh compensation map and adjusts the Z height during printing to follow the bed's contours.
How to Run ABL
- Home the printer. G28 homes all axes.
- Heat the bed. Always run ABL with the bed at printing temperature. A cold bed gives inaccurate readings.
- Run the leveling command. G29 for Marlin, BED_MESH_CALIBRATE for Klipper. Most printers also have a menu option.
- Wait for the probe to finish. The probe will touch the bed at a grid of points (3×3, 5×5, or more). This takes 1–5 minutes depending on grid size.
- Save the mesh. M500 (Marlin) or SAVE_CONFIG (Klipper) stores the mesh for future prints.
- Verify with a test print. ABL compensates for bed unevenness, but you still need to set the correct Z offset (see below).
Setting the Z Offset
The Z offset is the distance between the probe trigger point and the nozzle tip. Even with perfect ABL, if the Z offset is wrong, your first layer will be too high or too low.
How to calibrate Z offset:
- Home the printer and run ABL.
- Start a first-layer test print (a large square or circle covering most of the bed).
- While the first layer is printing, use the printer's menu to adjust the Z offset live (Babystepping in Marlin, Z Offset Adjust in Klipper).
- If the filament is not sticking or looks like thin round lines, decrease the Z offset (move nozzle closer to bed).
- If the filament is squished too flat, or you hear the nozzle scraping, increase the Z offset (move nozzle away).
- When the first layer looks like a smooth, flat, slightly squished ribbon with no gaps, the offset is correct.
- Save the new offset value.
The First Layer Test Print
The best way to verify bed leveling is a first-layer test. Print a large, thin shape — a 100×100 mm square, a circle, or a bed-leveling test pattern — at 0.2 mm layer height with no infill and 1–2 perimeters.
What to look for:
- Perfect: The filament is a smooth, flat ribbon. Lines are touching but not overlapping. The surface has a slight sheen. The part releases cleanly when the bed cools.
- Too high (Z offset too large): Lines are round and thin. Gaps between lines. The part may lift or not stick at all. Fix: decrease Z offset.
- Too low (Z offset too small): Filament is squished to nearly zero height. Nozzle may scrape the bed. "Elephant foot" on the first layer. Fix: increase Z offset.
- Uneven across bed: One corner sticks perfectly, another is too high. Fix: re-run ABL or manually adjust that corner.
Common Bed Leveling Mistakes
1. Leveling a cold bed. Always level at printing temperature. A glass bed can bow 0.1–0.2 mm when heated, which is enough to ruin a first layer.
2. Forgetting to save the mesh. You ran G29, the probe did its dance, and you started printing — but you forgot M500. Next power cycle, the mesh is gone. Always save.
3. A dirty bed. Finger oil, leftover adhesive, or dust on the build plate causes adhesion problems that look like leveling issues. Clean the bed with isopropyl alcohol (90%+) before leveling.
4. Over-tightened belts. If the X or Y belts are too tight, they can cause the gantry to bind, which affects Z height consistency. Belts should be tight enough to not slip, but not guitar-string tight.
5. Ignoring the Z offset. ABL is not magic. It compensates for bed shape, but the absolute height is still set by the Z offset. If your offset is 0.2 mm off, every point on the bed is 0.2 mm off.
Bed Leveling Test Prints
A visual test print is the best way to verify your leveling. Here are the most useful test patterns:
First-layer square: A 100×100 mm single-layer square. Print at 0.2 mm layer height with no infill and 1 perimeter. The lines should be flat, touching, and have a consistent appearance across the entire square.
Bed level test pattern: Available on Thingiverse and Printables, these patterns print small squares or circles at multiple points across the bed (9-point or 16-point grid). This reveals exactly which areas of the bed are too high or too low.
Spiral vase cylinder: A 100 mm tall, single-wall cylinder printed in spiral vase mode. If the wall thickness varies as it goes up, your Z offset or bed mesh needs adjustment. Consistent wall thickness means good leveling.
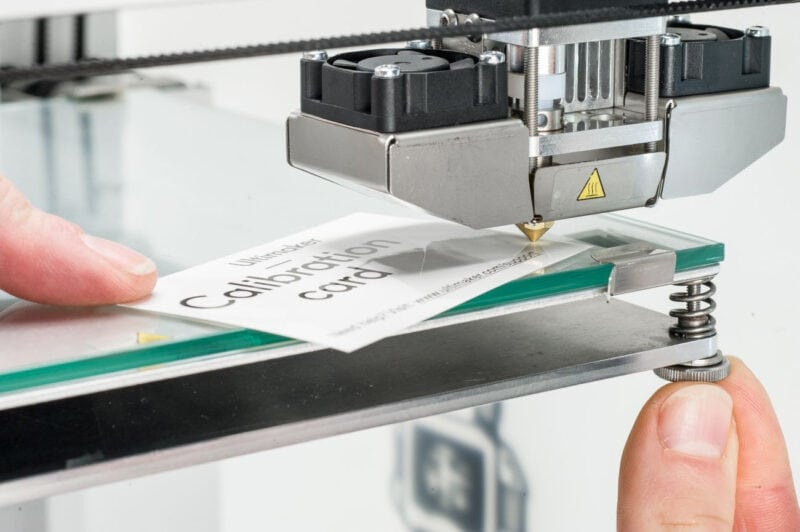
The paper test (or calibration card test) is the classic method for setting nozzle-to-bed distance. Aim for slight resistance when sliding the paper.
Maintaining Level Over Time
A well-leveled bed does not stay level forever. Here is what causes drift and how to catch it:
Temperature cycling: Repeated heating and cooling can cause the bed to shift slightly, especially with glass beds held by clips. Check leveling every 10–20 prints or after any bed removal.
Belt tension changes: As belts stretch or are re-tensioned, the gantry height can change. If you adjust belt tension, re-check Z offset.
Nozzle changes: Swapping nozzles changes the Z offset. Always re-calibrate Z offset after a nozzle change, even if you use the same nozzle length.
Bed surface replacement: Different PEI sheets have slightly different thicknesses. If you swap build plates, re-run ABL and re-check Z offset.
Printer relocation: Moving the printer, even across the room, can twist the frame. Re-level after any move.
How Often Should You Re-Level?
With ABL, you may only need to re-level every few weeks or after moving the printer. Manual leveling should be checked every 5–10 prints, or whenever you notice first-layer issues. If you swap build plates, re-level — different plates have different thicknesses and flatness.